

Optimal Egg Machine
A quest to cook the perfect egg

Who doesn’t love a delicious boiled egg in the morning? But everyone knows how tricky it can be to cook an egg to perfection. Too much heat and the texture turns grainy and dry, too little and the centre stays stubbornly raw.

Can we improve upon the humble boiled egg recipe using precision cooking to guarantee ourselves perfect eggs every time without investing in an overpriced laboratory-grade heat plate?
Egg Science
Egg cooks are challenged by a two-phase structure: albumen and yolk require two cooking temperatures…. the white and the yolk contain different blends of proteins, so the white gels at a higher temperature and a different rate than the yolk does - Periodic cooking of eggs
A popular recipe in restaurants that accounts for this is the so-called sous vide egg. The egg is immersed in water maintained at a precise temperature point (generally between 60 and 70°C) for one hour. The result is an egg where both whites and yolk have similar consistencies. My challenge is to create a device capable of cooking such an egg for the lowest possible cost.
Ingredients
Laboratory-grade temperature controlled heat plates are expensive. But the components required to build one are actually very cheap. For the heat source, I settled on this desoldering plate from AliExpress because it’s cheap, heats rapidly and requires zero drilling or assembly.

While it doesn’t have built-in temperature control, this can be added manually using a solid state relay which pulses power into the heat plate based on signals from an ESP32 microcontroller.
![[optimize output image]](https://substackcdn.com/image/fetch/$s_!4E87!,f_auto,q_auto:good,fl_progressive:steep/https%3A%2F%2Fsubstack-post-media.s3.amazonaws.com%2Fpublic%2Fimages%2F4759510e-9956-455c-ae26-ebcb6021ae15_1001x1096.gif "[optimize output image]")
Finally, I wanted an automated stirrer for even heat distribution, so I placed a small PC fan under the hot plate to spin magnets to create a vortex inside the beaker.
Visually it looks like a mess, but all of the electronics can easily be packaged away inside a 3D printed box, and thanks to the shockingly low cost of electronics on AliExpress, the total cost is less than £20!
Assembly
During my electronics and hardware meet-up we made a first attempt at assembling the circuit. While we were easily able to get the temperature sensors working, controlling the heater turned out to be much more difficult.

The issue is that the heater can reach 260 degrees in under 30 seconds. When I ran it in my room, it melted the the kapton tape I’d used to strap the temperature sensor to the hotplate and I had to evacuate my room until the toxic plastic fumes cleared…
The way this is handled in industrial applications is by using a PID loop which constantly compares the target temperature to the actual temperature, and adjusts the heater power in real-time to control the heating process.

After integrating a PID auto-tuning library, heating the water bath was much more controllable. It’s very convenient because it auto adjusts its parameters based on the volume of water, the number of eggs and the material of the container.

Testing
The heat plate is nicely calibrated. It can easily stay within +-0.5 degrees celsius of the target temperature. It was quite slow to heat up though, taking around an hour minutes to heat 300ml of water to 65 degrees. Also when I placed the egg inside the heat bath the temperature dropped 5 degrees and it took some time to recover to 65. These issues were both because I constrained the heater’s max power output as a safety precaution.

Here’s the cooked egg. It tasted pretty good!
Next Steps
The egg experiment was fun, but I’m not really interested in using this to cook eggs. My real goal is to use the heat plate as one component of an automated fluidic system capable of automating basic biology experiments, with my first goal being automated gradient PCR.
Precise temperature-controlled heat plates with magnetic stirrers are essential for this - I will need three of them set to precise temperatures to perform the thermo-cycling steps of PCR. Later I may use it for other purposes like incubation.
There are many quality of life improvements I’d like to add:
Solder and wire the circuit into a PCB.
Make a 3D printed case to hold the system together and hide away the cables.
Add a mini screen to track the temperature on the heat plate.
Wire up circuitry to power the ESP32, fan and heater from the same power source.
Better code to give me the confidence that it can run unattended without burning the house down.
Open source list of equipment, assembly instructions, software and CAD designs so anyone can experience the joy of perfectly cooked eggs!
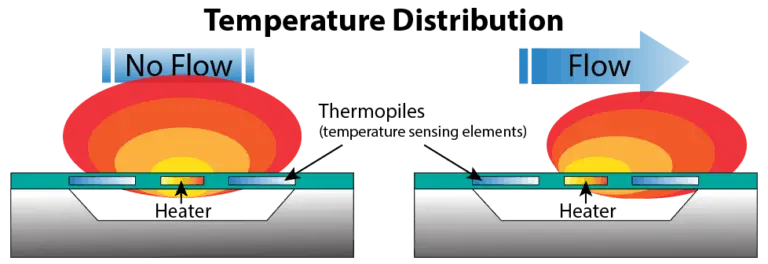
The next component I’m planning to work on is a thermal flow meter to non-invasively track the flow rate of fluid through capillary tubing.
If you are in London and want to help me build it, I started an electronics and hardware meet-up where I’ve been working on projects like this with friends. Here’s a video from a session where we built a syringe pump:
If that looks fun, DM me on Twitter and I will send you the details!